If you do not want to use the exam interface by clicking the button above, we have placed our sample DAT PAT practice questions below with the instructions for each section followed by answers and explanations. Good luck!
PART 1
Example:

The correct answer is A.
For the object to pass all the way through the aperture it has to be rotated first at 180 degrees from right to left and then, the side on the right is inserted first.
1.

A.
B.
C.
D.
E.
2.

A.
B.
C.
D.
E.
3.

A.
B.
C.
D.
E.
4.

A.
B.
C.
D.
E.
5.

A.
B.
C.
D.
E.
PART 2
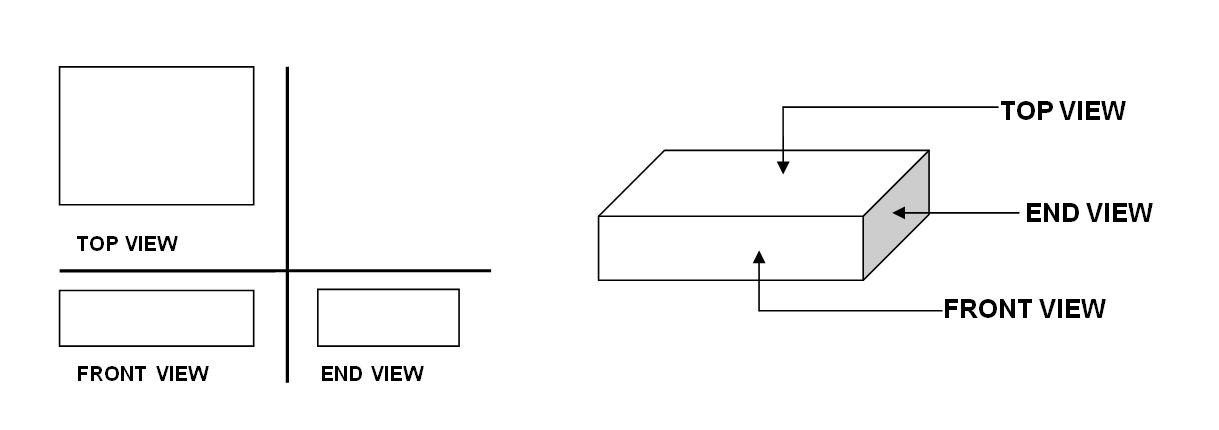
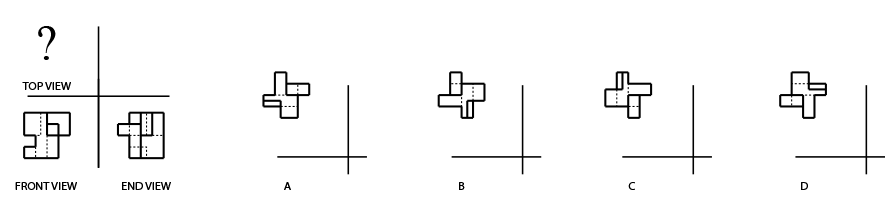
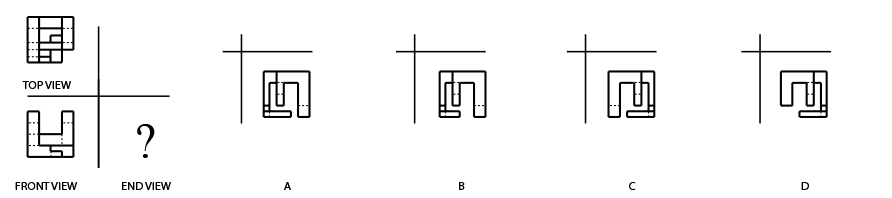
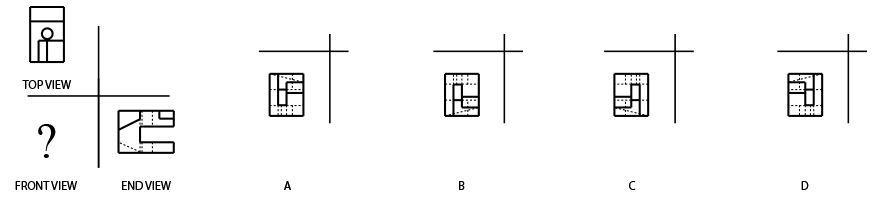
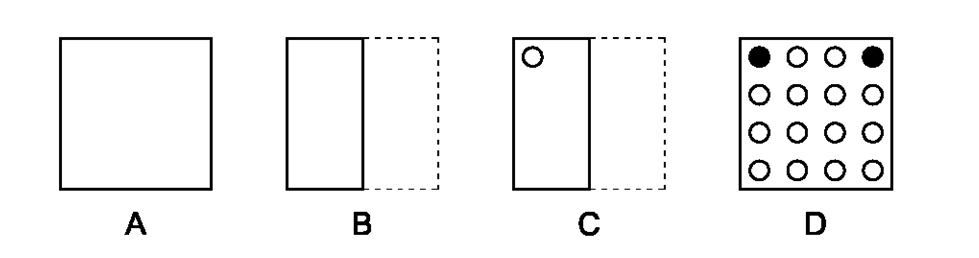
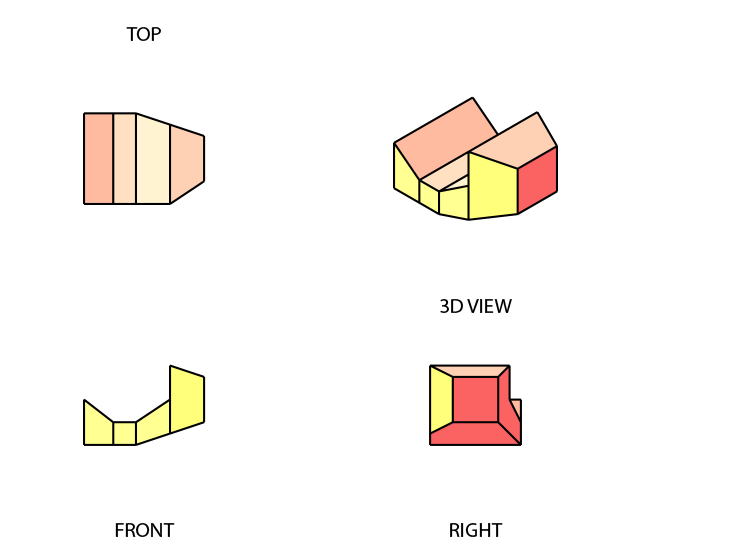
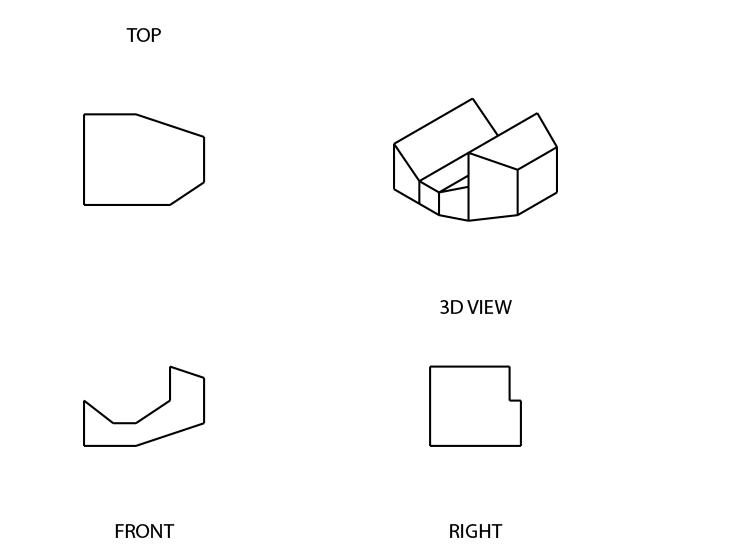
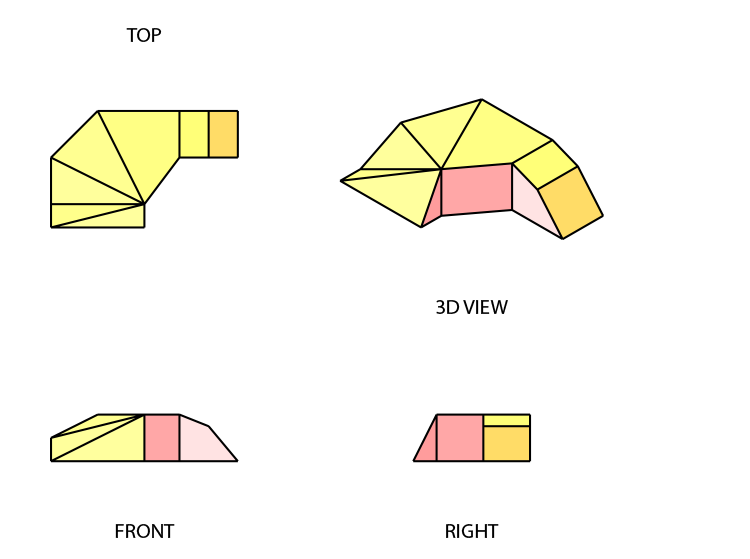
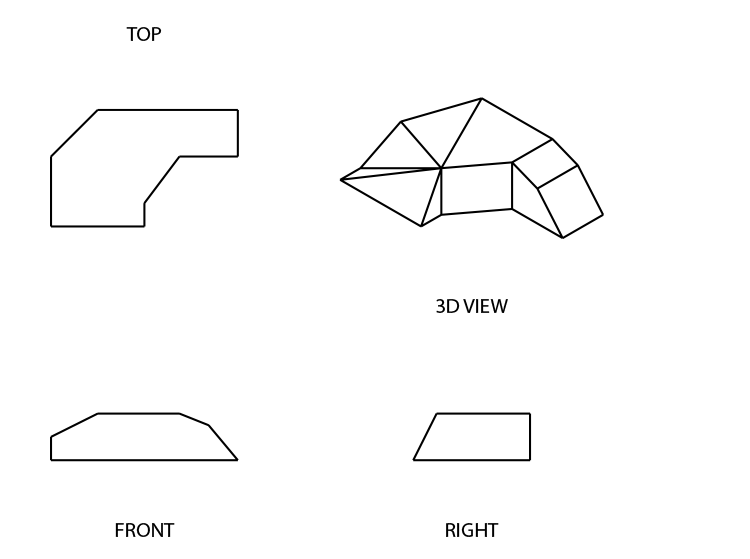
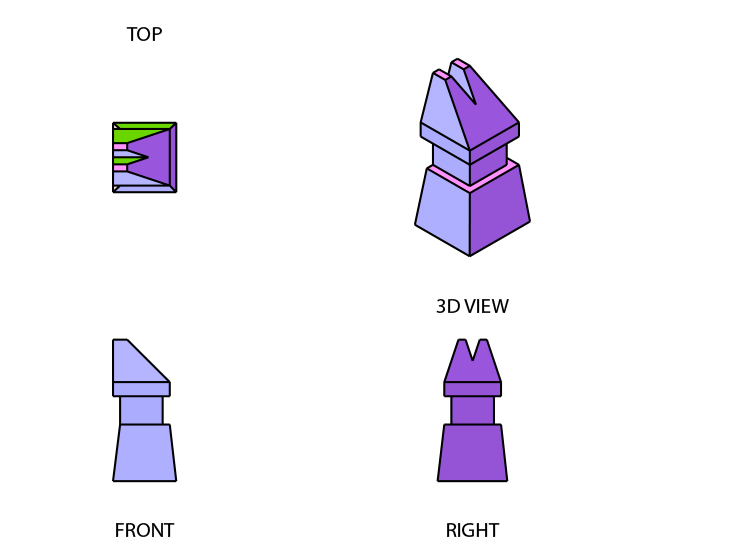
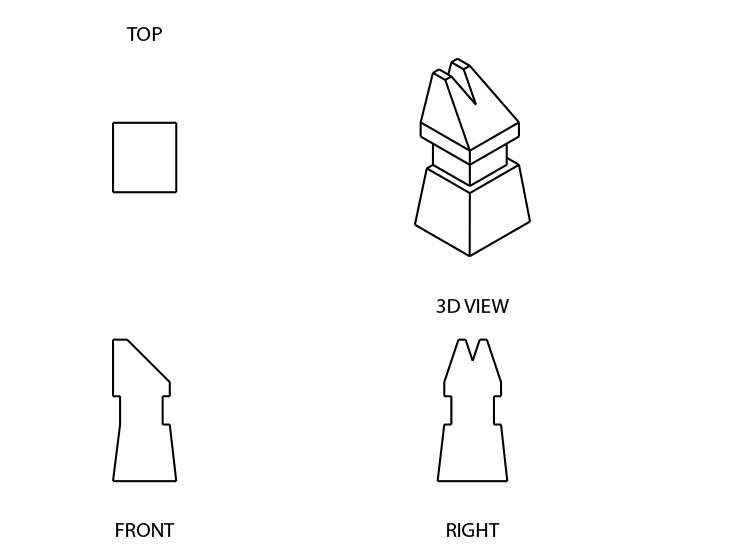
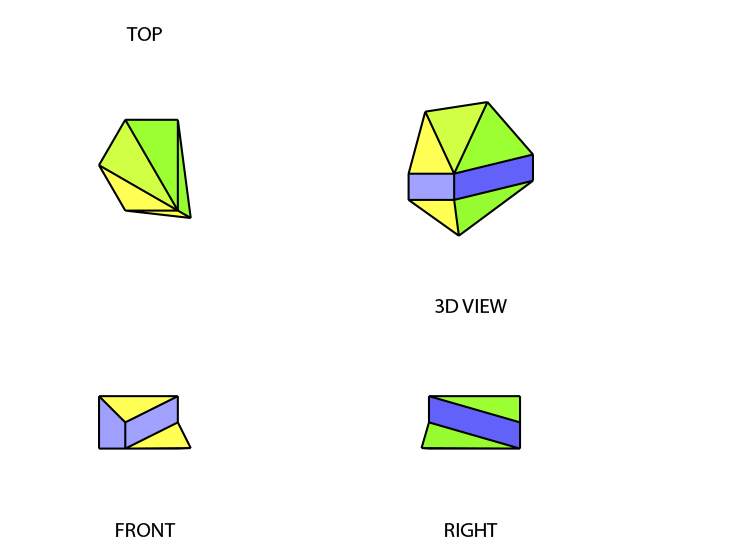
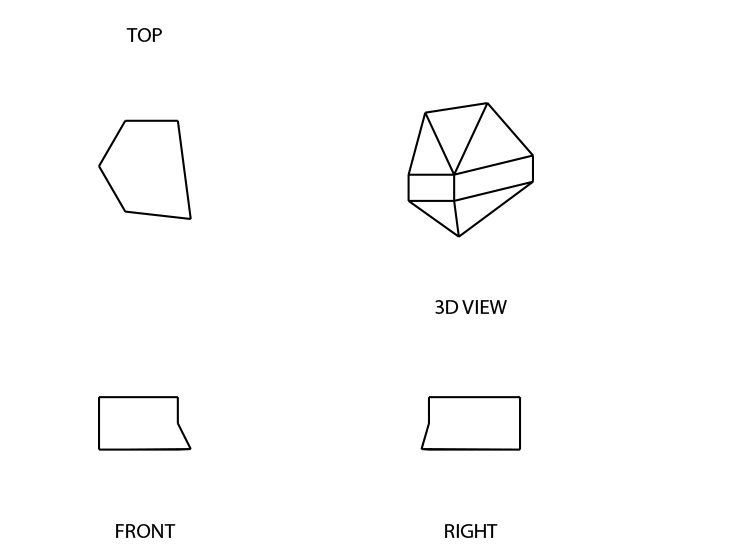
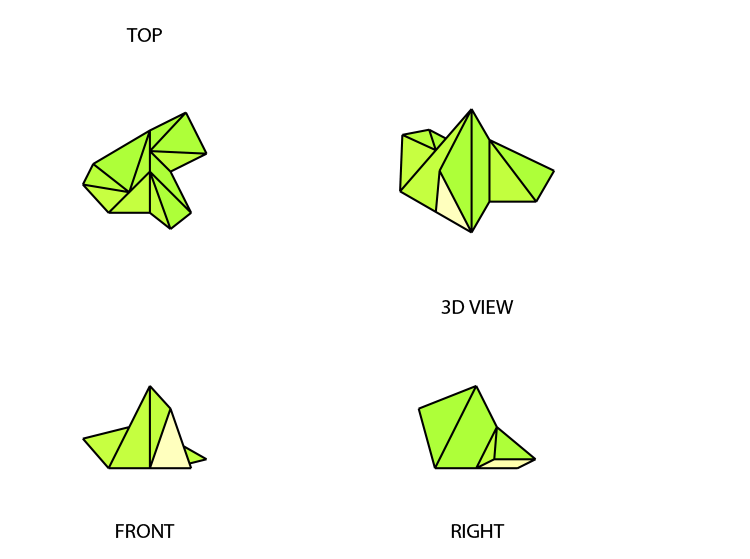
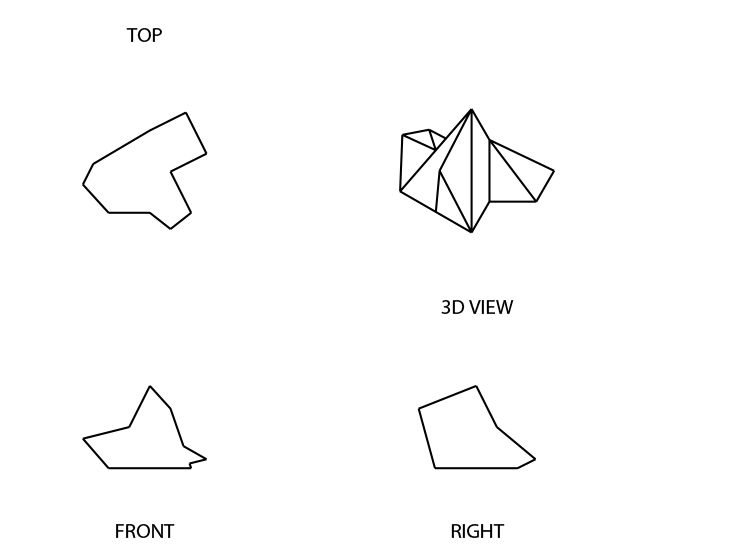
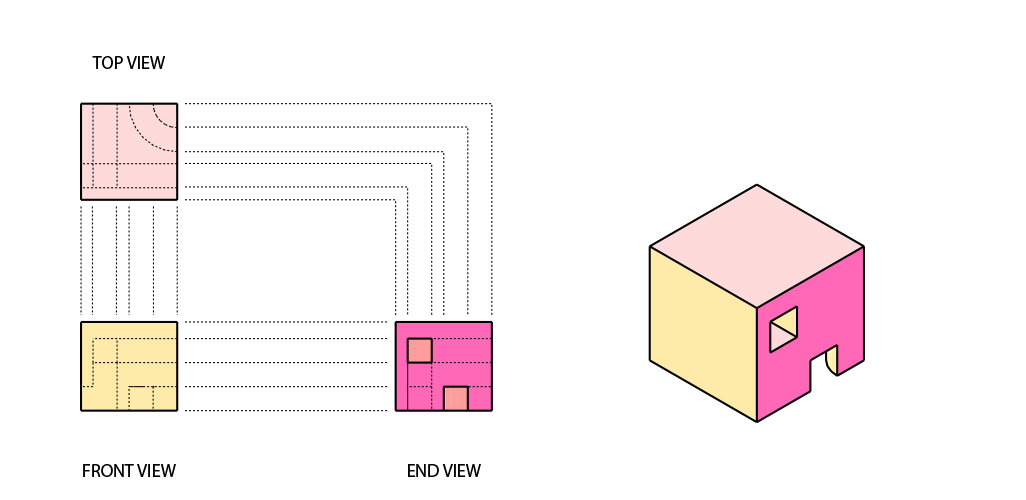
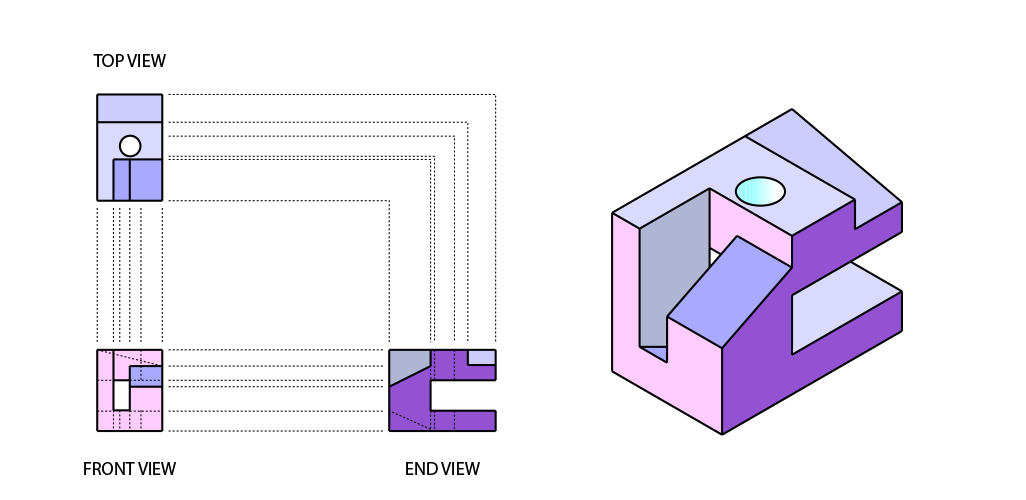
For questions 6 through 10: The following figure shows the top, front, and end views of a basic solid object. These are flat perspectives of the object where only points along the parallel lines of the object's surface are shown. The projection looking DOWN on the object (TOP VIEW) is in the upper left-hand corner of the illustration. The projection looking at the object from the FRONT (FRONT VIEW) is in the lower left-hand corner. The projection looking at the object from the RIGHT side (END VIEW) is in the lower right-hand corner. The positions of these views are ALWAYS the same in each question and are also labeled accordingly.
If the object had a hole in it, the views would look as such:
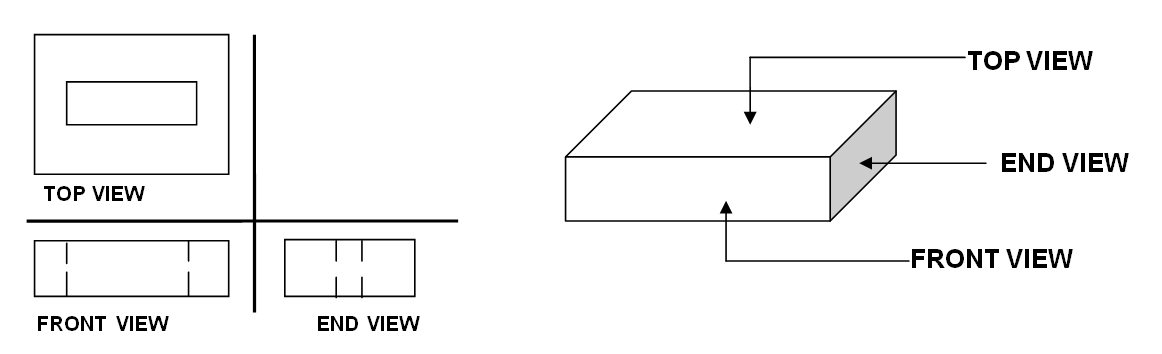
Points that are not visible on the surface of the object in a particular view are represented by DOTTED lines.
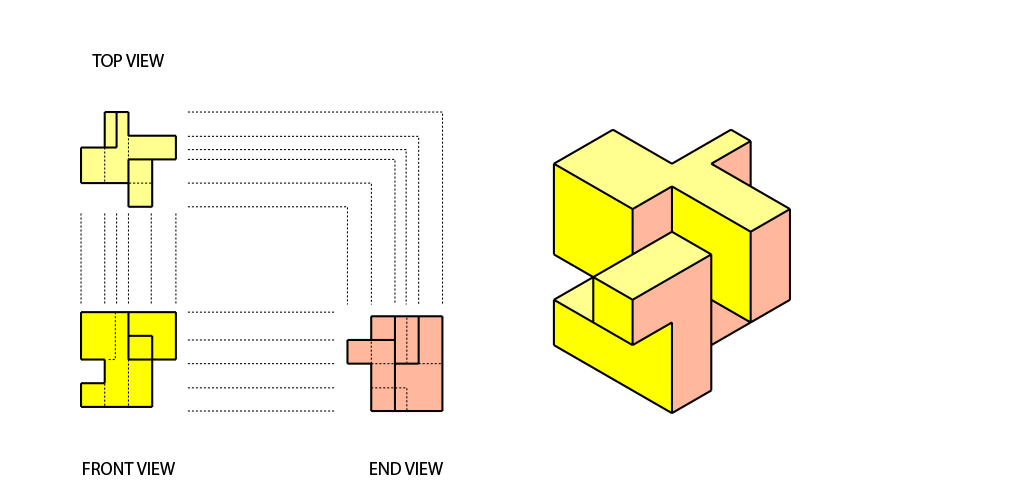
In the succeeding questions, two views are presented, followed by four options to complete the set. Pick the correct choice that corresponds to the missing view and mark it on the answer sheet.
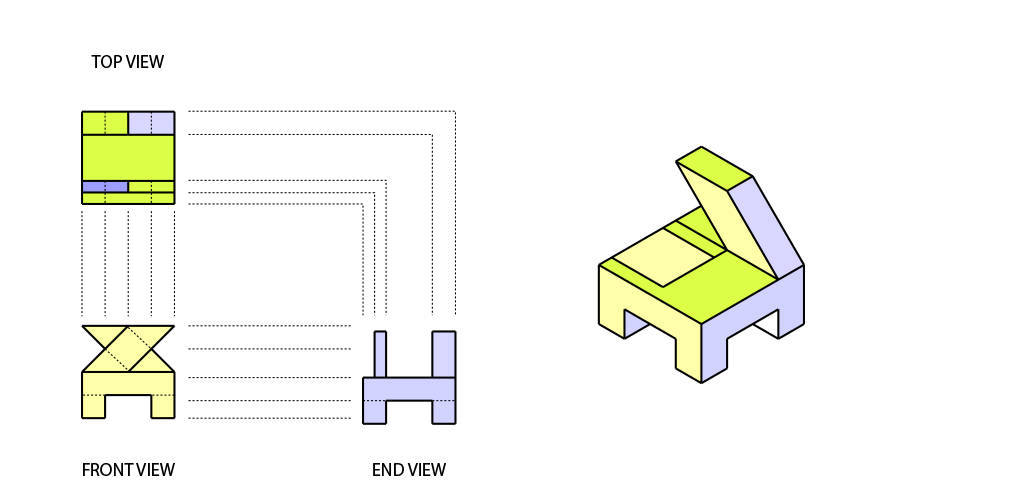
Example: Choose the correct END VIEW.
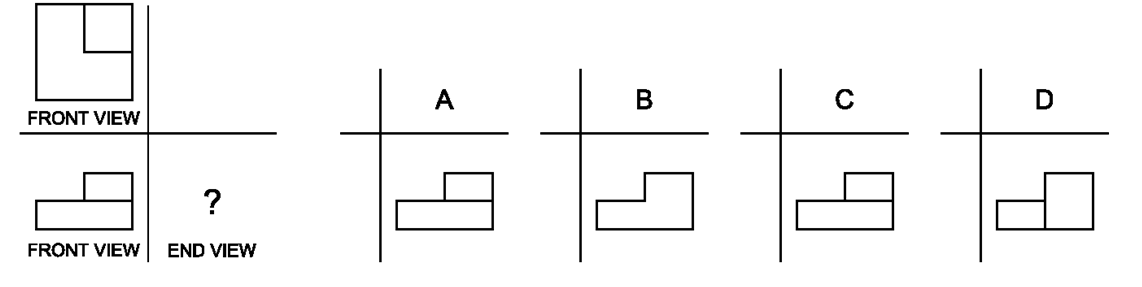
The correct answer is C.
The front view shows a smaller block on the base and no hole (because no dotted lines a shown). The top view shows that the block is a square and located on the upper left corner of the base. These characteristics correspond to the outline shown in option C if viewed from the right side of the object.
Please note that the problems given in the succeeding items do not always require you to choose the end view. The top view or front view may also be asked.
6.
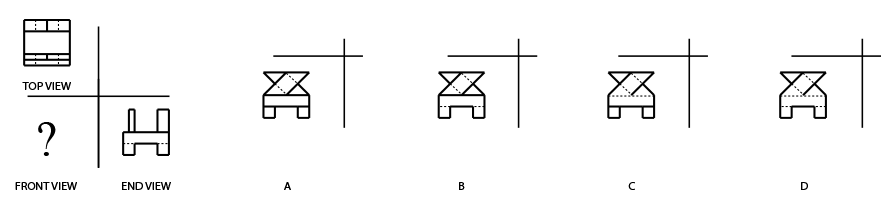
A.
B.
C.
D.
7.
A.
B.
C.
D.
8.

A.
B.
C.
D.
9.
A.
B.
C.
D.
10.
A.
B.
C.
D.
PART 3
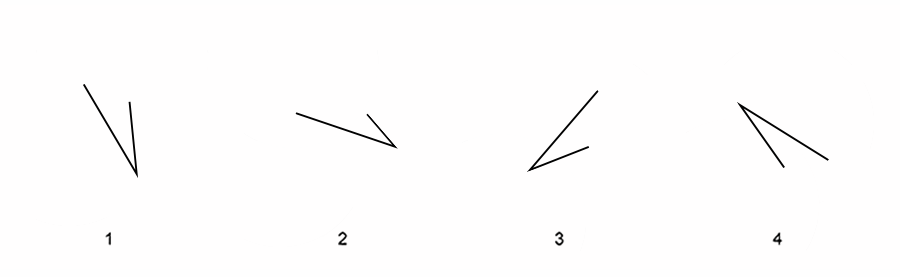
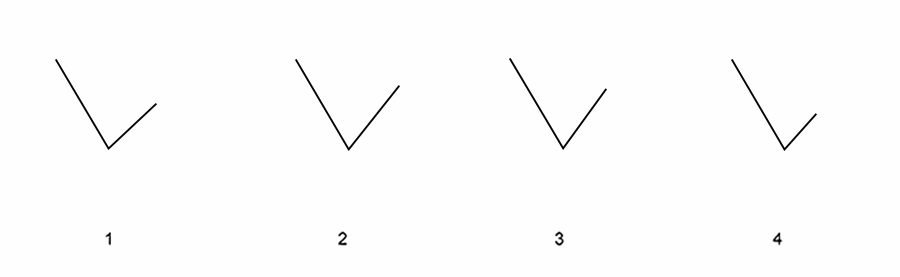
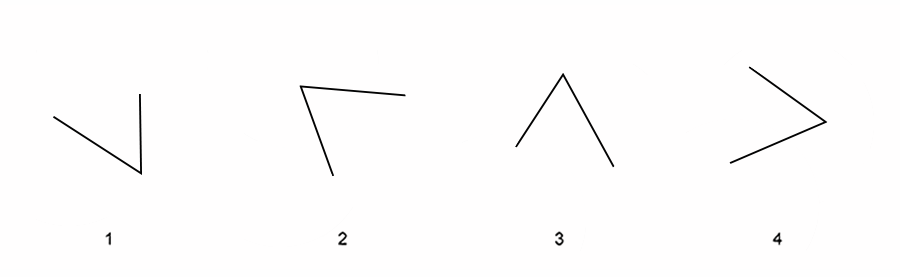
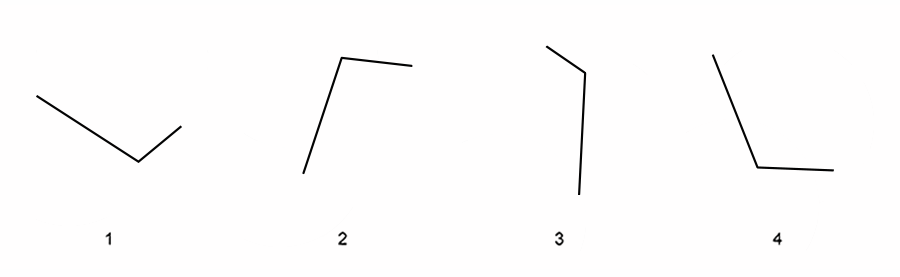
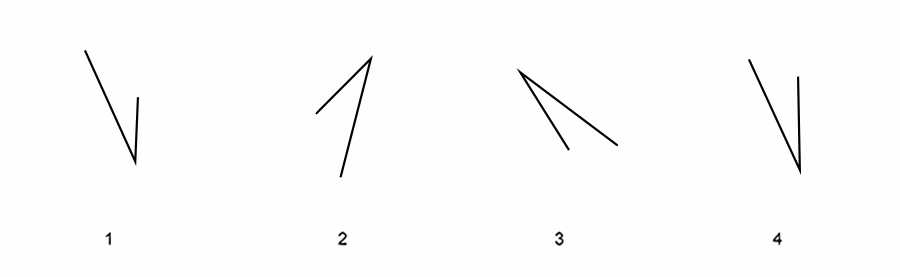
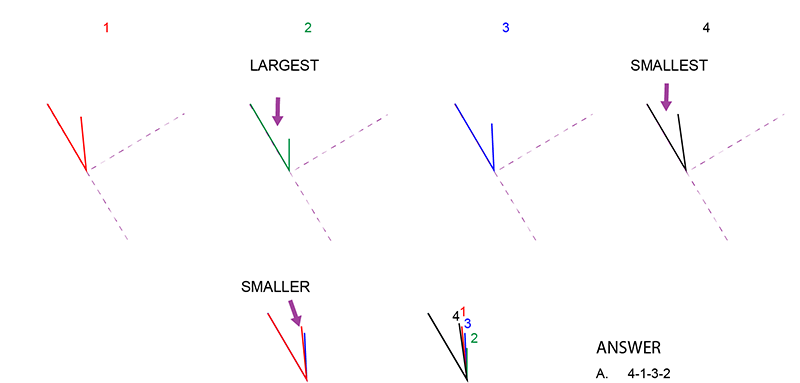
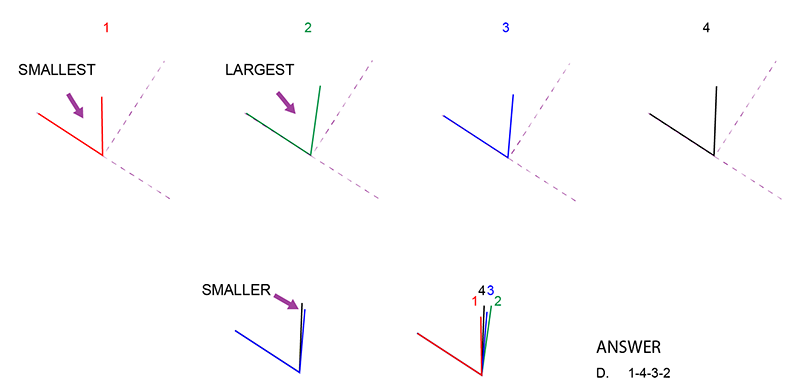
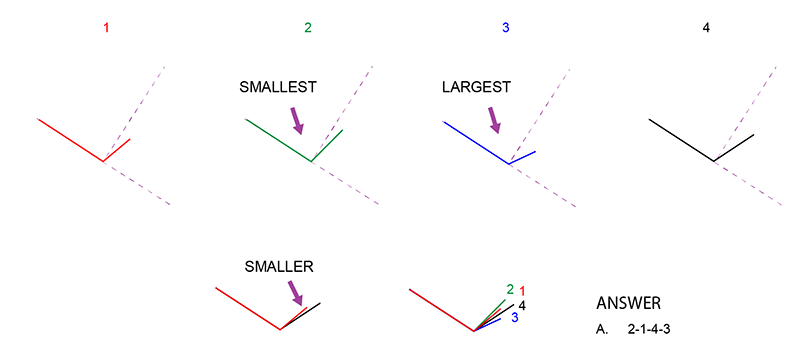
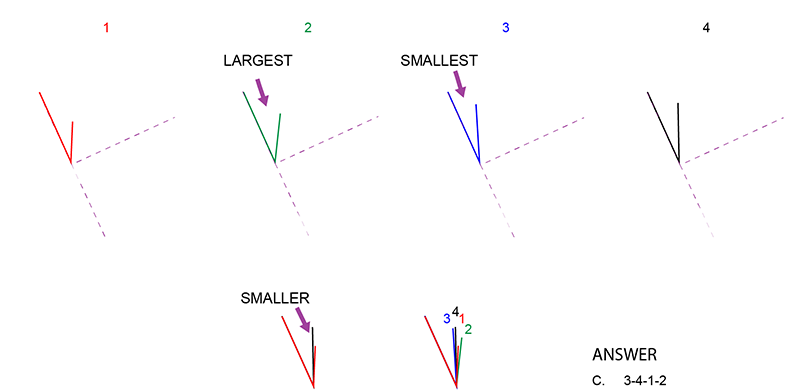
For questions 11 through 15: This section requires you to evaluate the four INTERIOR angles and rank each item from SMALL to LARGE in terms of degrees. From the alternatives, select the one with the correct order. Indicate your choice on the answer sheet.
Example:
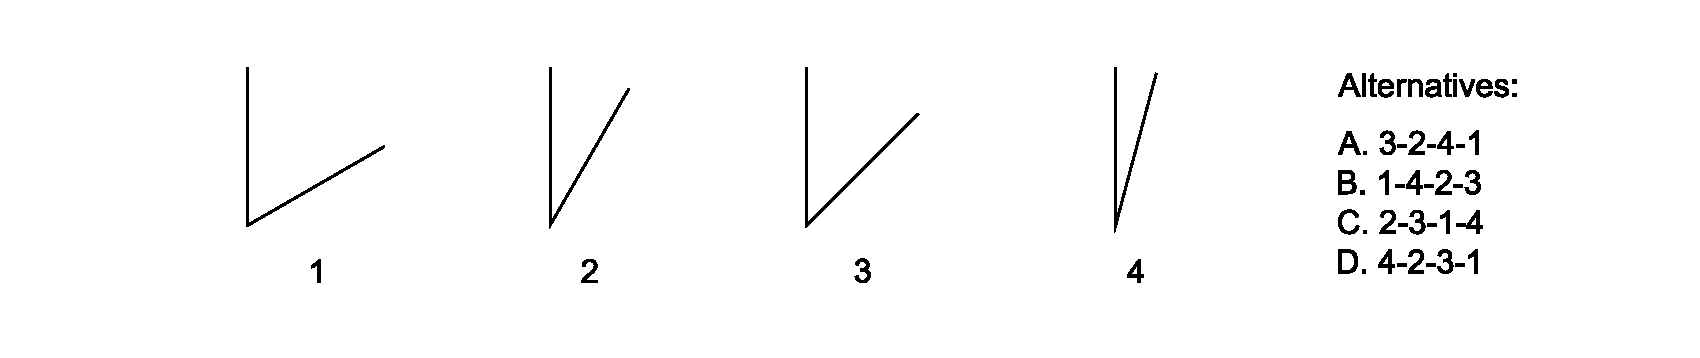
The correct answer is D.
The correct order of the angles from small to large is 4-2-3-1.
11.
A. 4-1-3-2
B. 2-3-1-4
C. 1-2-4-3
D. 2-4-3-1
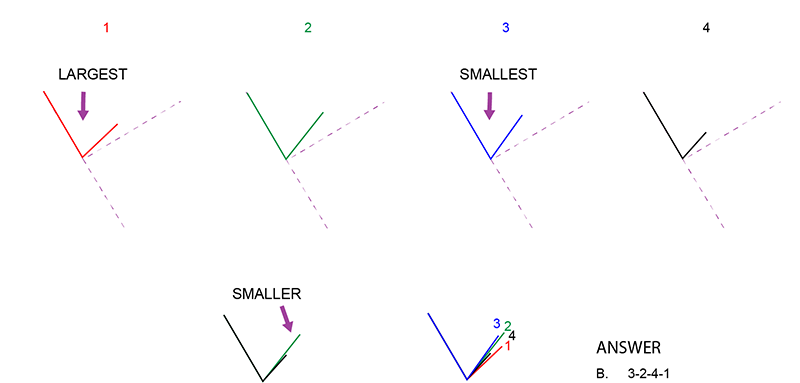
12.
A. 1-2-4-3
B. 3-2-4-1
C. 4-3-1-2
D. 1-4-3-2
13.
A. 2-4-3-1
B. 3-4-2-1
C. 3-1-4-2
D. 1-4-3-2
14.
A. 2-1-4-3
B. 3-4-2-1
C. 4-2-1-3
D. 3-2-4-1
15.
A. 2-1-3-4
B. 1-3-4-2
C. 3-4-1-2
D. 2-4-3-1
PART 4
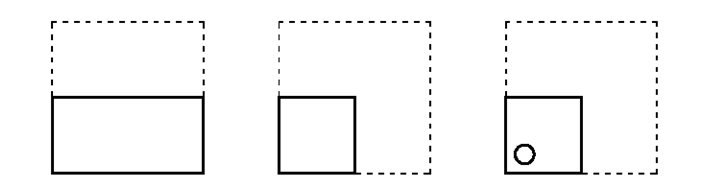
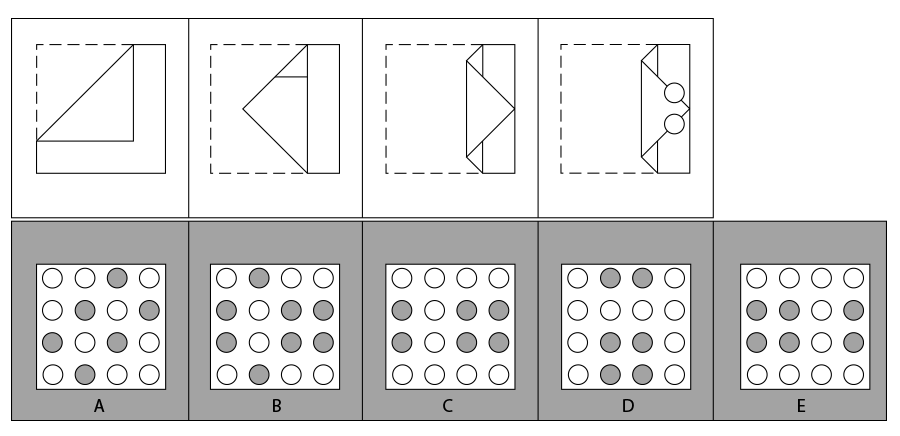
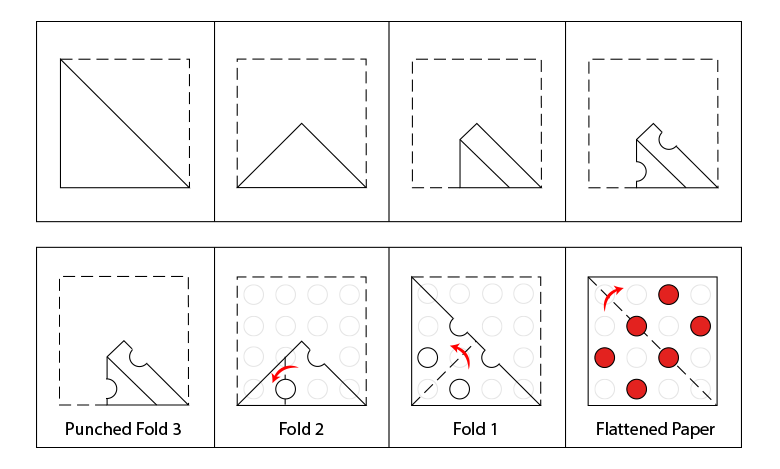
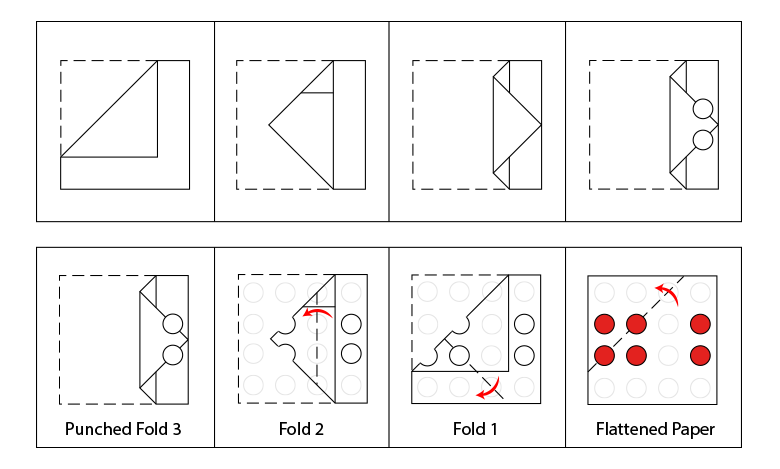
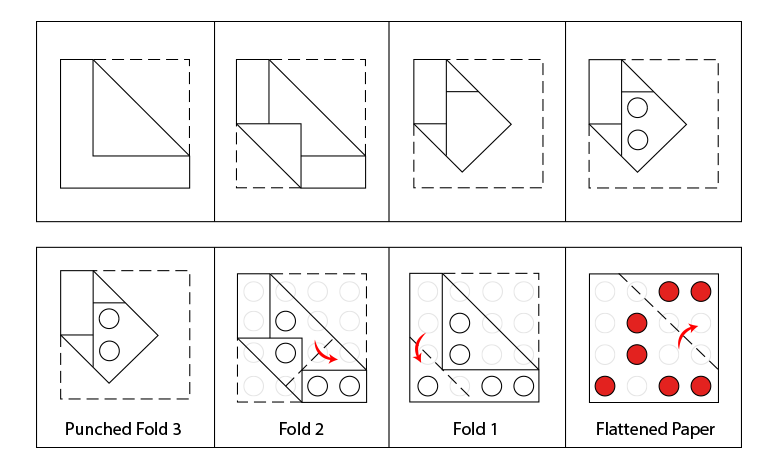
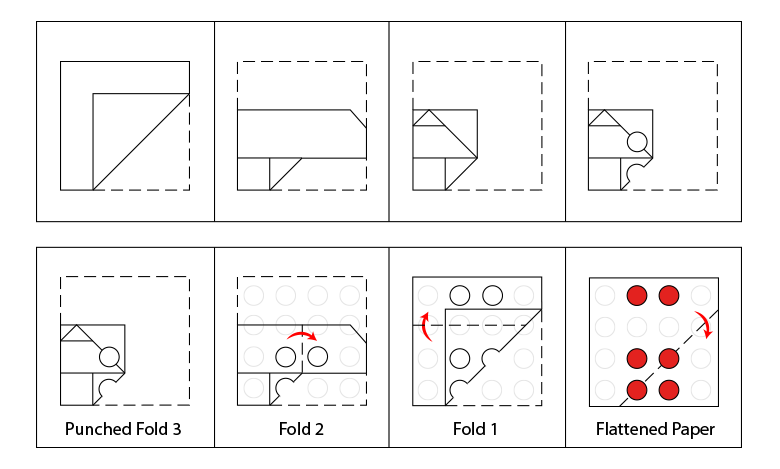
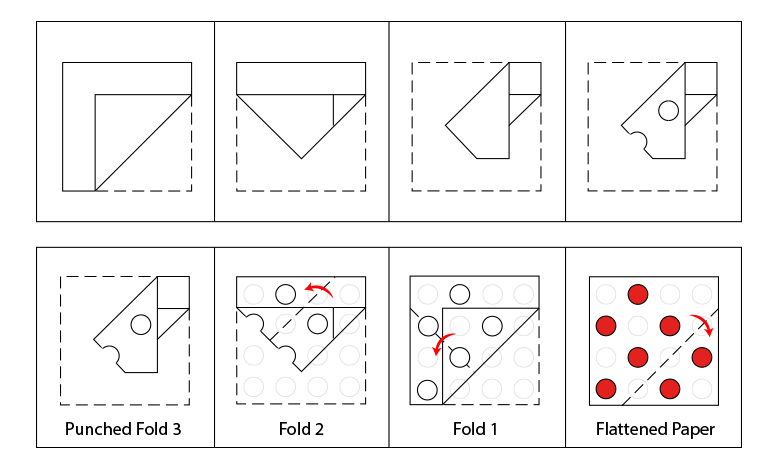
For questions 16 through 20: Each question in this section presents the following scenario: A square-shaped paper is folded one or more times. The broken lines in the next figures represent the main outline of the paper; the solid lines signify the position of the paper as it is being folded. Take note that the paper is never turned or twisted. This means that the folded paper always stays within the boundaries of the original square.
Each question shows the paper folded multiple times. After the last fold, the paper is punched with a hole. Your task is to visualize unfolding the paper and identifying the position of the holes on the unfolded square. Only one pattern is correct for each question.
Example 1:
In Example 1, Figure A shows the unfolded paper. Figure B shows the paper now folded in half. Figure C shows where the hole is punched on the folded paper. Figure D shows the resulting pattern of the holes, indicated by the darkened circles, on the original square.
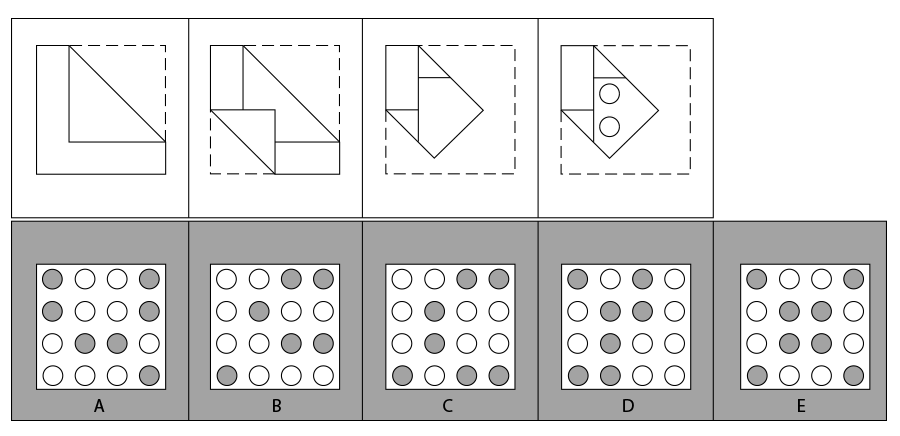
Example 2 shows how a question appears on the test.
Example 2:
The correct answer is B. The paper was four layers when punched, resulting to the holes placed in each of the four corners.
16.
A.
B.
C.
D.
E.
17.
A.
B.
C.
D.
E.
18.
A.
B.
C.
D.
E.
19.
A.
B.
C.
D.
E.
20.
A.
B.
C.
D.
E.
PART 5
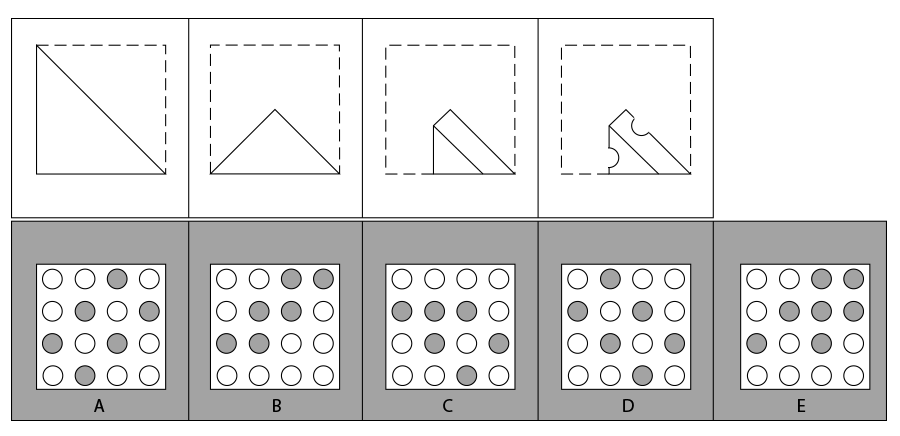
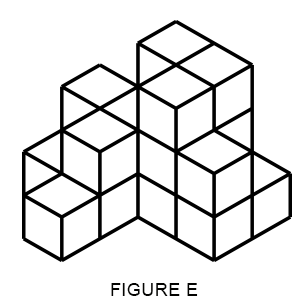
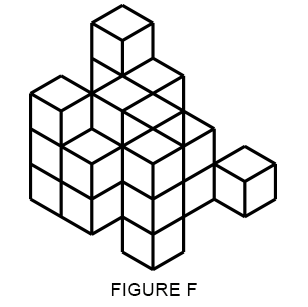
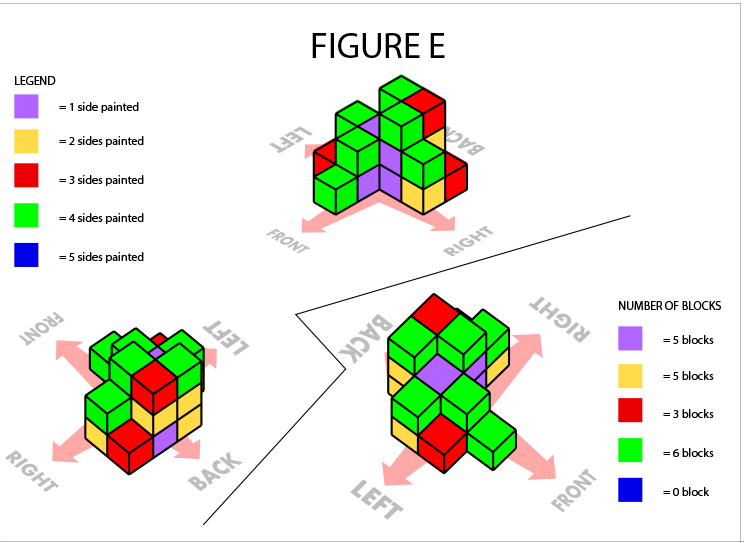
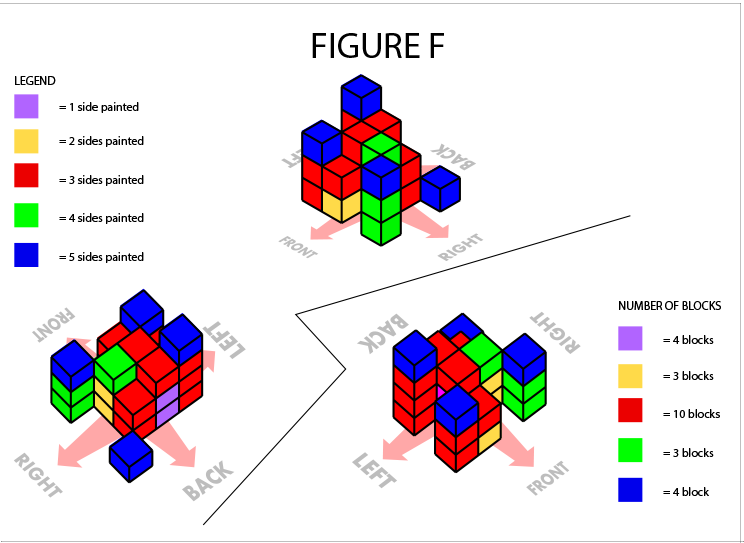
For questions 21 through 25: Each figure is constructed by stacking cubes on top of each other. Once they are stacked, all of the exposed surfaces, excluding the bottom surfaces, are painted. The number of painted sides per cube can range from zero to five. Do not forget that there are cubes "hidden" behind the other cubes.
For the questions in this section, you are required to evaluate each figure and conclude how many cubes have: only one of their sides painted. only two of their sides painted. only three of their sides painted. all five of their sides painted.
Remember: No problem will have zero (0) as the correct answer.
Example:

The correct answer is A.
There are four cubes in Figure 1. Three are visible, and one is hidden supporting the top cube. Two sides of the invisible cube are painted; five sides of the top cube are painted; and for each of the remaining two cubes, four of their sides are painted.
Note: The numbers in the cubes indicating the number of exposed sides shown in the sample (Figure 1) are not shown in the actual questions. However, it is important to remember that after the cubes are stacked together, each one is PAINTED ON ALL VISIBLE SIDES EXCEPT THE BOTTOM.
21. In Figure E, how many cubes have one of their exposed sides painted?
A. 1
B. 2
C. 3
D. 4
E. 5
22. In Figure E, how many cubes have two of their exposed sides painted?
A. 1
B. 2
C. 3
D. 4
E. 5
23. In Figure E, how many cubes have three of their exposed sides painted?
A. 1
B. 2
C. 3
D. 4
E. 5
24. In Figure F, how many cubes have two of their exposed sides painted?
A. 1
B. 2
C. 3
D. 4
E. 5
25. In Figure F, how many cubes have four of their exposed sides painted?
A. 1
B. 2
C. 3
D. 4
E. 5
PART 6
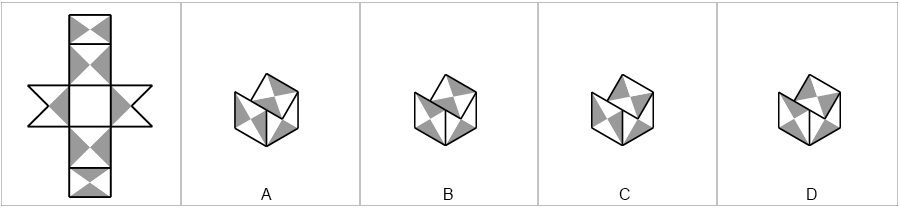
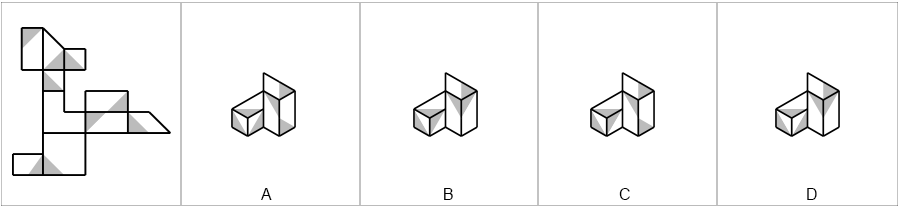
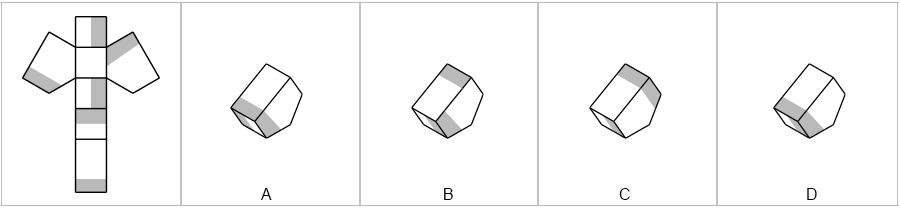
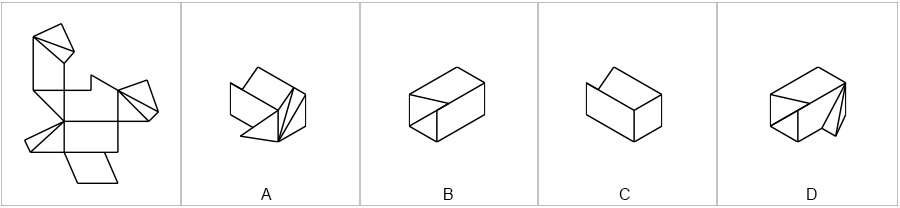
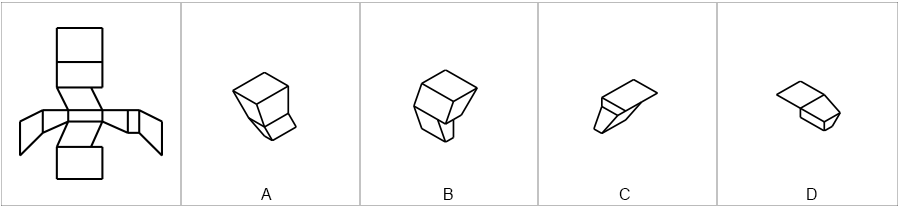
For questions 26 through 30: Each question in this section will present a flat pattern, which will then be folded into a three-dimensional model. Four options of the resulting actual figure are given. Only one model is correct in every set.
Some figures will have shaded portions similar to the pattern shown in the example below. The shaded areas are not necessarily the "sides" of a figure. They can be the top or the bottom of the figure as well.
Example:
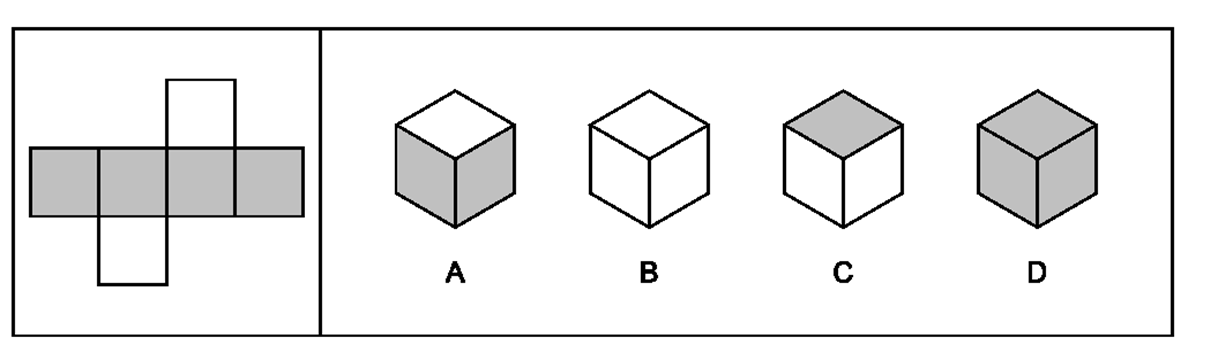
The correct answer is A.
From the given figures A, B, C, or D, the shaded parts obviously form as the sides of the box. The resulting model will then have all four sides shaded while the top and bottom will be white. This makes A the best answer.
26.
A.
B.
C.
D.
27.
A.
B.
C.
D.
28.
A.
B.
C.
D.
29.
A.
B.
C.
D.
30.
A.
B.
C.
D.
1. A
2. D
3. B
4. C
5. A
6. B
7. C
8. D
9. A
10. A
11. A
12. B
13. D
14. A
15. C
16. A
17. E
18. C
19. D
20. A
21. E
22. B
23. C
24. C
25. C
26. A
27. C
28. D
29. A
30. B
1. Correct answer: A
Explanation:
2. Correct answer: D
Explanation:
3. Correct answer: B
Explanation:
4. Correct answer: C
Explanation:
5. Correct answer: A
Explanation:
6. Correct answer: B
Explanation:
7. Correct answer: C
Explanation:
8. Correct answer: D
Explanation:
9. Correct answer: A
Explanation:

10. Correct answer: A
Explanation:
11. Correct answer: A
Explanation:
12. Correct answer: B
Explanation:
13. Correct answer: D
Explanation:
14. Correct answer: A
Explanation:
15. Correct answer: C
Explanation:
16. Correct answer: A
Explanation:
17. Correct answer: E
Explanation:
18. Correct answer: C
Explanation:
19. Correct answer: D
Explanation:
20. Correct answer: A
Explanation:
21. Correct answer: E
Explanation:
22. Correct answer: B
Explanation:
23. Correct answer: C
Explanation:
24. Correct answer: C
Explanation:
25. Correct answer: C
Explanation:
26. Correct answer: A
Explanation:
Pattern Folding Test Explanation - Question 26
27. Correct answer: C
Explanation:
Pattern Folding Test Explanation - Question 27
28. Correct answer: D
Explanation:
Pattern Folding Test Explanation - Question 28
29. Correct answer: A
Explanation:
Pattern Folding Test Explanation - Question 29
30. Correct answer: B
Explanation:
Pattern Folding Test Explanation - Question 30
Discuss any of our DAT PAT Practice Questions or explanations here: DAT PAT Practice Forum
For more free DAT PAT practice questions PLUS 1-hour free access to DAT Natural Sciences videos online, register here: Free DAT-prep User Account.

Copyright DAT-prep.com. All Rights Reserved.
*DAT is a registered trademark of the Association of American Medical Colleges ( AAMC), which does not endorse this study guide or our methodology.